
Looking for a yarn?


Comments / Questions (66)
![]() Lili wrote:
Lili wrote:
Hej\r\nJeg forstår ikke helt antallet af masker. Derfor 2 spørgsmål vedr halsedissen:\r\nHvorfor skal der være 2 ret-m i slutningen af pinden, så der bliver for mange masker i mønsteret, når det er syet sammen yderst i kant-m? (Jeg forstår heller ikke at der er 2 kant-m i den ene ende og ikke 1 i hver ende). \r\nHvorfor skal det ikke strikkes rundt på rundpind i stedet for frem og tilbage? Så ville man undgå en masse vrang-m og montering
24.10.2022 - 21:18DROPS Design answered:
Hej Lili, Det kan være fordi du får lidt bedre hold i siden når du strikker hulmønster, men du gør naturligvis hvad der passer dig bedst. Se videoen vi har lavet til denne opskrift, du finder en nederst i opskriften :)
26.10.2022 - 09:42
![]() Marie-france wrote:
Marie-france wrote:
Comment adapté ce modele en circulaire, merci
04.08.2022 - 12:11
![]() Olimpia Stella wrote:
Olimpia Stella wrote:
Si Graziepuò eseguire il modello senza usare i ferri circolari; ed eventualmente come?
18.06.2020 - 15:00
![]() Olimpia Stella wrote:
Olimpia Stella wrote:
Si Graziepuò eseguire il modello senza usare i ferri circolari; ed eventualmente come?
18.06.2020 - 14:59DROPS Design answered:
Buongiorno Olimpia. Sia il cappello che lo scaldacollo sono lavorati in ferri di andata e ritorno. Può quindi usare i ferri dritti al posto dei circolari e seguire le spiegazioni riportate senza dover fare modiche. Buon lavoro!
18.06.2020 - 15:15
![]() Charlotte Jensen wrote:
Charlotte Jensen wrote:
Hejsa Jeg sidder og strikker denne hue: Drops 150-42. Har nu gentaget mønstret 4 gange. :-) Skal jeg tage ind inden sidste retpind, inden jeg afslutter mønsterraporten 4. gang eller?? Charlotte
22.01.2020 - 20:14DROPS Design answered:
Hej Charlotte, nej du sætter kun mærkerne på næstsidste pind, fortsætter med mønsteret og begynder at tage ind når arbejdet måler 19cm, da strikker du glatstrik. God fornøjelse!
30.01.2020 - 08:55
![]() M.f. Van Winden wrote:
M.f. Van Winden wrote:
Goedendag, ik wil de muts en sjaal breien, maar ik mis in het telpatroon de aanwijzing voor de beide streepjes, de vakjes staan in wit getekend. Met daarachter of 1 steek afhalen, volgende recht breien, afgehaakde steek overhalen. En ander wit vakje 2 recht samen breien.
05.01.2017 - 20:31Milica wrote:
Dear all, I do not fully understand the correction on hat. What is the full text between **? I also do not understand the decrease after 16th marker. If I put the marker in A3 I have only 2 stitches after that marker. Then I can not do the decrease 16 stitches 5 times to get 15 stitches at the end (95st-16st*5=15st remains), I am losing the marker after first decrease row. I appreciate any help. Thank you in advance
27.11.2016 - 15:31DROPS Design answered:
Dear Milica, the correction is included in the online pattern. When piece measures 19-20 cm, work as follows: *2 rows in stocking st. Then dec by K 2 tog after every marker = 16-17 sts dec. Work 3 rows in stocking st. Then dec by K 2 tog after every marker = 16-17 sts dec, K 1 row *, repeat from *-* (= 8 rows) 1 more time (= 2 times in total = 16 rows in total). Happy knitting!
28.11.2016 - 09:30Sueli wrote:
Boa tarde. Sou do Brasil Eu ainda não consegui entender onde como e onde diminuir. agradeço muito sua atenção
05.07.2016 - 16:20Jessica wrote:
Thank you so much for help. I have one more question. The tutorial video are used 6mm or 8mm round rods?
20.05.2016 - 14:31DROPS Design answered:
Dear Jessica, the video shows 1 full repeat in height, ie 8 rounds for each repeat in height - read more here. Happy knitting!
20.05.2016 - 14:36Jessica wrote:
My last question was related to neck scarf.
19.05.2016 - 22:46DROPS Design answered:
Dear Jessica, the previous answer applies to the hat - for the neck scarf, you repeat A.2 a total of 20 times in width, ie row starts with 1 edge st, then work A.1 (worked 1 time in width), then repeat A.2 a total of 20 times in width, and finish with A.3 (worked 1 time in width) and 1 edge st. Happy knitting!
20.05.2016 - 10:30
|
||||||||||||||||
Autumn Mist |
||||||||||||||||
|
|
||||||||||||||||
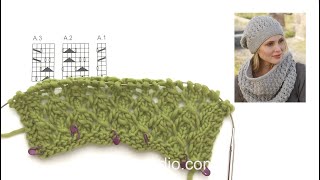
Knitted DROPS neck warmer and hat with lace pattern in ”Lima”.
DROPS 150-42 |
||||||||||||||||
|
GARTER ST (back and forth on needle): K all rows. 1 ridge = K2 rows. PATTERN: See diagrams A.1, A.2 and A.3, diagrams show all rows in pattern seen from RS. ---------------------------------------------------------- HAT: Worked back and forth on needle. Cast on 95-101 sts on needle size 4 mm / US 6 with Lima. Work RIDGES in garter st – see explanation above – until piece measures 5-6 cm / 2''-2½''. On next row from RS switch to needle size 5 mm / US 8 and work as follows: 2 edge sts in garter st (worked in garter st until finished measurements), PATTERN A.1 (= 2 sts) – see explanation above – A.2 (= 6 sts) until 7 sts remain (= 14-15 repetitions in width), A.3 (= 5 sts), finish with 2 edge sts in garter st (worked in garter st until finished measurements). Work 4 repetitions with pattern vertically AT THE SAME TIME insert a marker in the one st that remains after every dec on next to last row in pattern = 16-17 markers. Continue pattern until piece measures 19-20 cm / 7½"-8". Make sure to finish after one whole or half repetition of A.2. Now continue piece in stockinette st as follows: * Work 2 rows in stockinette st. Then dec by K 2 tog after every marker = 16-17 sts dec. Work 3 rows in stockinette st. Then dec by K 2 tog after every marker = 16-17 sts dec, K 1 row *, repeat from *-* 1 more time (= 2 times in total). Then work 2 rows in stockinette st, on next row dec after every marker by K 2 tog = 16-17 sts dec = 15-16 sts remain on needle. Cut the yarn and pull it through the remaining sts. Tighten tog and fasten. ASSEMBLY: Sew side tog in outer loops of edge sts. NECK WARMER: Worked back and forth on circular needle. Cast on 131 sts on circular needle size 5 mm / US 8 with Lima. Work 2 RIDGES in garter st - see explanation above. On next row from RS work 2 edge sts in garter st, PATTERN A.1 (= 2 sts) - see explanation above - diagram A.2 (= 6 sts) until 7 sts remain (= A.2 has been worked 20 times in total), diagram A.3 (= 5 sts), 2 edge sts in garter st. When piece measures approx. 40 cm / 15 3/4'' (and 12 repetitions have been worked vertically), work 2 ridges in garter st. Piece measures approx. 42 cm / 16½''. Loosely bind off. ASSEMBLY: Sew neck warmer tog in outer loop of edge sts. Cut and fasten the yarn. |
||||||||||||||||
Diagram explanations |
||||||||||||||||
|
||||||||||||||||

|
||||||||||||||||
|
Have you made this or any other of our designs? Tag your pictures in social media with #dropsdesign so we can see them! Do you need help with this pattern?You'll find 16 tutorial videos, a Comments/Questions area and more by visiting the pattern on garnstudio.com. © 1982-2025 DROPS Design A/S. We reserve all rights. This document, including all its sub-sections, has copyrights. Read more about what you can do with our patterns at the bottom of each pattern on our site. Have you finished this pattern? |
||||||||||||||||


With over 40 years in knitting and crochet design, DROPS Design offers one of the most extensive collections of free patterns on the internet - translated to 17 languages. As of today we count 314 catalogs and 11800 patterns - 11790 of which are translated into English (US/in).
We work hard to bring you the best knitting and crochet have to offer, inspiration and advice as well as great quality yarns at incredible prices! Would you like to use our patterns for other than personal use? You can read what you are allowed to do in the Copyright text at the bottom of all our patterns. Happy crafting!
Post a comment to pattern DROPS 150-42
We would love to hear what you have to say about this pattern!
If you want to leave a question, please make sure you select the correct category in the form below, to speed up the answering process. Required fields are marked *.