
Looking for a yarn?


Comments / Questions (8)
![]() Fr wrote:
Fr wrote:
Comment puis je faire ce chale mais en plus haut car il es vraiment trop petit en hauteur. j'aimerai 70-80 cm en hauteur au milieu merci
16.12.2024 - 11:05DROPS Design answered:
Bonjour Fr, il vous suffit probablement juste de continuer avec les augmentations indiquées jusqu'à la longueur souhaitée, notez toutefois qu'il vous faudra peut-être ajuster les augmentations de chaque côté pour éviter qu'il ne soit trop large d'envergure. Bon tricot!
17.12.2024 - 09:24
![]() Johanna wrote:
Johanna wrote:
Hallo Drops team, breidt men de omslagen voor en na de kantsteken gedraaid recht om een gaatje te voorkomen?
06.05.2021 - 21:00DROPS Design answered:
Dag Johanna,
Nee, deze worden niet gedraaid gebreid.
07.05.2021 - 09:54
![]() Johanna wrote:
Johanna wrote:
Hallo Drops team, hartelijk bedankt voor dit ontwerp. Onder OMSLAGDOEK - naald 3 staat "[...] 1 steek recht afhalen, 1 recht, 1 omslag (= 1 steek gemeerderd), 1 kantsteek in ribbelsteek." Moet dit zijn 1 steek averecht afhalen in plaats van recht? Alvast bedankt voor uw reactie. Mvg, Johanna
06.05.2021 - 14:28DROPS Design answered:
Dag Johanna,
Nee, dit is ook 1 recht, net als aan het begin van de naald.
07.05.2021 - 10:04
![]() Diana Morris wrote:
Diana Morris wrote:
What does "fog" mean in the American English version
25.01.2020 - 15:17DROPS Design answered:
Dear Mrs Morris, this is the colour of the yarn used here - see DROPS Air schadecard here. Happy knitting!
27.01.2020 - 10:23
![]() Isa wrote:
Isa wrote:
Hallo, in der deutschsprachigen Version bin ich auf folgende, sich widersprechende Arbeitsanleitung gestossen: Nun wird auch in diesen 3 Maschen in jeder 2. Reihe des Patentmusters zugenommen/in den 3 markierten Maschen in jeder 8. Reihe zunehmen. Könnten Sie dies bitte richtig stellen? Vielen Dank im Voraus!
06.01.2020 - 00:21DROPS Design answered:
Liebe Isa, es wird neben 1 Rand-Masche in jeder Reihe wie zuvor zugenommen und dazu wird es in jeder 8. Reihe in den 3 markierten Maschen zugenommen. Viel Spaß beim stricken!
06.01.2020 - 09:48
![]() Karen Margrethe wrote:
Karen Margrethe wrote:
Godaften. Jeg har købt garn til dette sjal, Drakkar, og glæder mig til at komme i gang. Jeg har prøvestrikket mønsteret i et andet garn fra mit lager :) for at lære mønsteret. Men jeg kan ikke få kanten pæn eller til at lade være med at stramme. Den ligner slet ikke den, der er på billedet. Opskriften: alle pinde slutter med en ret, slå om, en ret. Alle pinde begynder med en ret, slå om en ret. Altså en knudekant. Er det rigtigt?
09.04.2019 - 21:43DROPS Design answered:
Hei Karen. Det stemmer at du øker med 1 kast i hver ende, innenfor kantmasken i rettstrikk/rille. Dette er kanten du ser helt øverst på sjalet. Kanten langs siden og nederst på sjalet er avfellingskanten, den blir annerlededes enn starten/slutten på hver rad. God fornøyelse.
10.04.2019 - 14:22
![]() Dea wrote:
Dea wrote:
Scusate, mi sono accorto di aver letto male spiegazioni. In ogni caso ho trovato un piccolo errore al FERRO 3 della spiegazione dello Scialle. Dice di passare una maglia a diritto, ma le maglie se si devono passare le si passa solo a rovescio.
10.11.2018 - 22:44DROPS Design answered:
Buongiorno Dea. Abbiamo corretto il testo. La ringraziamo per la segnalazione. Buon lavoro!
11.11.2018 - 15:50
![]() Dea wrote:
Dea wrote:
Buonasera. Il ferro 1 delle tecniche e il ferro 1 dello scialle non combaciano come procedimento perchè? In quello delle tecniche dice così FERRO 1 (= rovescio del lavoro): Lavorare con il colore nebbia come segue:..... lavorare insieme a diritto la maglia gettata e la maglia passata *, ripetere da ..." nell'altro questa frase FERRO 1 (= rovescio del lavoro): ".. lavorare insieme a diritto la maglia gettata e la maglia passata.." non c'è.
10.11.2018 - 21:10
|
|
Drakkar |
|
 |
 |
Knitted shawl in DROPS Air with English rib in two colors.
DROPS 194-14 |
|
|
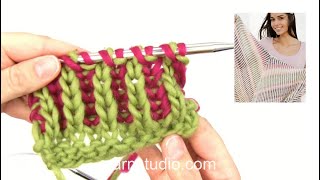
------------------------------------------------------- EXPLANATIONS FOR THE PATTERN: ------------------------------------------------------- RIDGE/GARTER STITCH (worked back and forth): 1 ridge = Knit 2 rows. ENGLISH RIB IN TWO COLORS: ROW 1 (=wrong side): Work with fog as follows 1 edge stitch in garter stitch, 1 yarn over (= 1 stitch increased), knit 1, * 1 yarn over, slip 1 stitch as if to purl, knit yarn over and slipped stitch together *, work from *-* until there are 3 stitches left (including the yarn over), 1 yarn over, slip 1 stitch as if to purl, knit 1, 1 yarn over (= 1 stitch increased) and 1 edge stitch in garter stitch. Turn the piece. ROW 2 (= right side): Work with fog as follows: 1 edge stitch in garter stitch, 1 yarn over (= 1 stitch increased), knit 1, * 1 yarn over, slip 1 stitch as if to purl, knit yarn over and slipped stitch together *, work from *-* until there are 3 stitches left (including the yarn over), 1 yarn over, slip 1 stitch as if to purl, knit 1, 1 yarn over (= 1 stitch increased) and 1 edge stitch in garter stitch. Push the stitches back on the needle so that you work them from the same side again and change color - read KNITTING TIP-1. ROW 3 (= right side): Work with wheat as follows: 1 edge stitch in garter stitch, 1 yarn over (= 1 stitch increased), knit 1, * 1 yarn over, slip 1 stitch as if to purl, purl yarn over and slipped stitch together *, work from *-* until there are 3 stitches left (including the yarn over), 1 yarn over, slip 1 stitch as if to purl, knit, 1 yarn over (= 1 stitch increased) and 1 edge stitch in garter stitch. Turn the piece. ROW 4 (= wrong side): Work with fog as follows: 1 edge stitch in garter stitch, 1 yarn over (= 1 stitch increased), knit 1, * 1 yarn over, slip 1 stitch as if to purl, purl yarn over and slipped stitch together *, work from *-* until there are 3 stitches left (including the yarn over), 1 yarn over, slip 1 stitch as if to purl, knit 1, 1 yarn over (= 1 stitch increased) and 1 edge stitch in garter stitch. Push the stitches back on the needle so that you work them from the same side again and change color. ROW 5 (= wrong side): Work with wheat as follows: 1 edge stitch in garter stitch, 1 yarn over (= 1 stitch increased), knit 1, * 1 yarn over, slip 1 stitch as if to purl, knit yarn over and slipped stitch together *, work from *-* until there are 3 stitches left (including the yarn over), finish with 1 yarn over, slip 1 stitch as if to purl, knit 1, 1 yarn over (= 1 stitch increased) and 1 edge stitch in garter stitch. Turn the piece. Repeat rows 2-5 upwards. KNITTING TIP-1: If you are in doubt as to which color to use on the next row, you can see the color used on the previous row by the color of the edge stitch. INCREASE TIP: All increases are made on a row with fog from the right side. Work 5 stitches in the stitch and yarn-over as follows: * Knit yarn over and stitch together, but wait with slipping them off the needle, make 1 yarn over the right needle *, work from *-* a total of 2 times and knit the stitch and yarn over together 1 more time = 5 stitches (= 4 stitches increased). On the next row work the stitches into the pattern. NOTE: work each increased stitch individually (do not work yarn over and stitch together). ------------------------------------------------------- START THE PIECE HERE: ------------------------------------------------------- SHAWL - SHORT OVERVIEW OF THE PIECE: The piece is worked back and forth with circular needle. SHAWL: Cast on 5 stitches with circular needle size 6 mm = US 10 and fog. Knit 1 row. ROW 1 (= from the wrong side): 1 edge stitch in GARTER STITCH – read description above, 1 yarn over (= 1 stitch increased), knit 1, 1 yarn over, slip 1 stitch as if to purl, knit 1, 1 yarn over (= 1 stitch increased), 1 edge stitch in garter stitch. In other words, increase 1 stitch by working 1 yarn over inside the 1 edge stitch in garter stitch in each side, the yarn overs which are part of the English rib are not used to increase, i.e. they are worked together with the stitch beside them on the next row. ROW 2 (= from right side): Work 1 edge stitch in garter stitch, 1 yarn over (= 1 stitch increased), knit 1, 1 yarn over, slip 1 stitch as if to purl, knit the yarn over and slipped stitch together, 1 yarn over, slip 1 stitch as if to purl, knit 1, 1 yarn over (= 1 stitch increased), 1 edge stitch in garter stitch. ROW 3: 1 edge stitch in garter stitch, 1 yarn over (= 1 stitch increased), knit 1, * 1 yarn over, slip 1 stitch as if to purl, knit yarn over and slipped stitch together *, work from *-* until there are 3 stitches left (including the yarn over), 1 yarn over, slip 1 stitch as if to knit, knit 1, 1 yarn over (= 1 stitch increased), 1 edge stitch in garter stitch. ROW 4: 1 edge stitch in garter stitch, 1 yarn over (= 1 stitch increased), knit 1, * 1 yarn over, slip 1 stitch as if to purl, knit yarn over and slipped stitch together *, work from *-* until there are 3 stitches left (including yarn over), 1 yarn over, slip 1 stitch as if to purl, knit 1, 1 yarn over (= 1 stitch increased), 1 edge stitch in garter stitch = 13 stitches (without the English rib yarn overs). REMEMBER THE KNITTING GAUGE! Then work ENGLISH RIB IN TWO COLORS – read description above, first row from the wrong side. You are now increasing 2 stitches on each row, inside the 1 edge stitch. When rows 1 to 5 have been worked 1 time there are 23 stitches on the needle (without the English rib yarn-overs). Insert 1 marker in each of the 3 middle knitted stitches seen from the right side (i.e. knitted stitches in fog). Now also increase in these 3 stitches on row 2 in the English rib - read INCREASE TIP (= 14 stitches increase in total). Continue to increase in each side inside 1 edge stitch on each row and increase in the 3 stitches with markers every 8th row. There will be more stitches between the knitted stitches with the markers each time you increase. Continue like this until the piece measures 40 cm = 15¾", measured in middle of shawl. Bind off with wheat, knit over knit and purl over purl, but the yarn overs are bind off as normal stitches so that the bind-off edge is not tight. |
|
|
Have you made this or any other of our designs? Tag your pictures in social media with #dropsdesign so we can see them! Do you need help with this pattern?You'll find 11 tutorial videos, a Comments/Questions area and more by visiting the pattern on garnstudio.com. © 1982-2025 DROPS Design A/S. We reserve all rights. This document, including all its sub-sections, has copyrights. Read more about what you can do with our patterns at the bottom of each pattern on our site. Have you finished this pattern? |
|


With over 40 years in knitting and crochet design, DROPS Design offers one of the most extensive collections of free patterns on the internet - translated to 17 languages. As of today we count 314 catalogs and 11800 patterns - 11790 of which are translated into English (US/in).
We work hard to bring you the best knitting and crochet have to offer, inspiration and advice as well as great quality yarns at incredible prices! Would you like to use our patterns for other than personal use? You can read what you are allowed to do in the Copyright text at the bottom of all our patterns. Happy crafting!
Post a comment to pattern DROPS 194-14
We would love to hear what you have to say about this pattern!
If you want to leave a question, please make sure you select the correct category in the form below, to speed up the answering process. Required fields are marked *.